Tips on Video Lighting
 “Tips On Video Lighting” is offered free of cost as a way of sharing knowledge. Feel free to down load the tips or to offer them as a part of a learning process. Please keep in mind that any humor is not meant to hurt feelings or to demean any person or group. Check this page often for new tips!
Good luck on your next shoot,
What’s Your Lighting Style? Read This First!
Before a contractor can build a house, he needs a plan. If we look at what we do as contractors, we too need a plan before we begin to build the lighting for a scene. On large movie sets, lighting plans are established long before the production date and can include the DP consulting with the director, the set designer and the producer, to name a few, in order to get an idea for what the scenes need to look like. Usually, a floor plan with type of lights, wattage and locations will be presented as a blue print of what is expected. By planning ahead, a DP will know how long it will take to set up lighting, where it will go, amperage needed and what equipment will be needed to bring or rent for the shoot.
When lighting a theatrical set, the script should motivate the look of the scene. Normally, pools of light and shadow make for a more natural adn believable feel. In the case of a small or no budget shoot, an approach using flat lighting or shooting strictly under available light may not be enough to depict the mood intended for your scene let alone the entire movie. This approach can have an affect on the technical as well as the esthetic outcome of the shoot. On a commercial shoot, lighting becomes even more critical because consistency is expected throughout the entire scene. (See our tip – Lighting For 35mm HDSLRs).
We need to have a plan that includes the technical approach to lighting a scene as well as a visual plan or “STYLE.”
Before determining what lights will be needed for a shoot, we need to consider two important factors, flesh tone reflectance and lighting ratios. You need to establish the percent of flesh tone reflectance that you would like to introduce before establishing your ratios. Once you have decided on a flesh tone reflectance, regardless of the tone of the subject that you are shooting, you will need to maintain that reflectance as your reference. That means, that once you set up the look of the scene with the quality of light needed to tell your story, that look needs to stay consistent throughout the coverage.
For example; if you choose a 27% reflectance for a Caucasian subject, that reflectance needs to remain consistent for the close up shot, the medium shot and master shot. Here is the point that I would like to make; in order to maintain consistency in your coverage you will need to employ large light sources in order to make the throw to where the light is needed on the set and still maintain your established reflectance. You are not going to do this with a 1’x1’ lite panel or a 650 watt softlite. You will need to do a lighting plan based on subject to light distance, light output, color output and any manipulation that you intend to do to the lights such as color correction, diffusion, bounce etc.
Once our flesh tone reflectance has been determined we can move on to establishing a lighting ratio. To help better under stand lighting ratios, I am introducing the work of 3 well known Master Artists.
Take a look at how they interpret light! You will notice that key lights and shadows seem to have a deliberate reason for existing and do not appear to be accidental. Also, notice that the percent of reflectance that each artist has chosen, as what would be our Key light, are all very similar in tone.
So, what is the different in the styles of light interpretation? The ratios! Lets say they all decided that the reflectance for the Key light would be f-4 or around 70% on the waveform monitor, what determines the ratio? It is the density of shadow in the foreground, action area and the background of the scene.
Looking at the various artists work, you can see a distinct difference in their style.
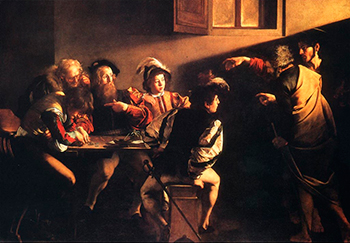
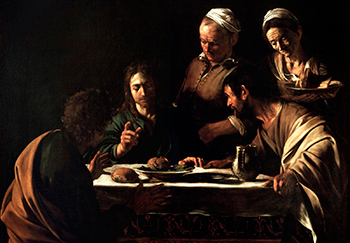
- Michelangelo Merisi da Caravaggio (1571 – 1610) was an Italian artist active in Rome, Naples, Malta, and Sicily between 1593 and 1610. His paintings, which combine a realistic observation of the human state, both physical and emotional, with a dramatic use of lighting, had a formative influence on the Baroque school of painting.
Caravaggio typically would light (paint) with deep shadows. Notice how the ratio resembles a 16:1 to 32:1 or, a 4 – 5 stop difference between the highlight and shadow
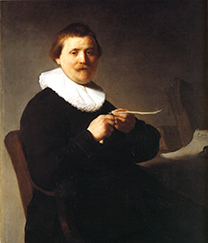
- Rembrandt Harmenszoon van Rijn (1606 – 1669) a Dutch painter, generally considered one of the greatest painters in European art history and the most important in Dutch history. His contributions to art came in a period of great wealth and cultural achievement that historians call the Dutch Golden Age.
Even though Rembrandt did paint with many of his backgrounds going in to deep shadows resembling a 16:1 ratio, most of his backgrounds were around a 4:1 – 8:1 ratio, a 2 – 3 stop difference between the highlight and shadow.

- Johan (Jan) Vermeer (1632 – 1675) was a Dutch painter who specialized in domestic interior scenes of middle class life and is known for the painting, “The Girl With The Pearl Earring.”
- Vermeer painted with shadows that are more open compared to Rembrandt and Caravaggio. The ratio between highlight and shadow resemble more of a 4:1 ratio which is a 2 stop difference between high light and shadow.
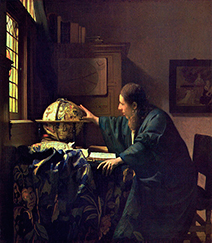
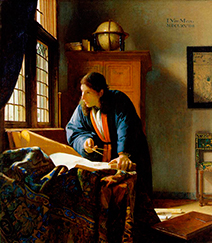
As previously mentioned, the reflectance of what we would consider the Key light is pretty much the same in all these instances, yet the overall looks are considerably different due to the change in lighting ratios in each scene. It is a good idea to study the styles of master painters as well as still photographers and other DPs as a way of establishing your own style.
Understanding The Difference Between Latitude & Dynamic Range?
With so much discussion about camera sensitivity, it seems that many of us are confused over the difference between Exposure Range or “Dynamic Range” and Latitude. I often hear or read that a camera has 10 stops of latitude; this is a bit of misinformation; if a camera did have 10 stops of Latitude, we wouldn’t need to worry about lighting, lighting ratios, exposure or f-stops. There wouldn’t be any need! Latitude is the amount of under or over exposure one can be off from the optimum exposure and still render an acceptable image.
Normally, if you are more than a stop off in exposure with any camera, when you correct the levels in post, you will see the obvious image degradation. If we boast that a camera can capture a large range of tonal values from white to black and we are able to capture detail within that range then that is the dynamic range of the camera or the exposure range. If you ever shot indoors and noticed that the windows were blown out rendering no detail, then your camera‘s dynamic range is limited to that particular exposure range and you must add lighting techniques in order accommodate that lack of range. Our Lighting DVD explains how a light meter can help you assess and over come limited exposure range.
The actual usable dynamic range of a camera can be directly correlated to the exposure range on a waveform monitor (see DVD for more info.).
Definitions
Dynamic Range is a measure of a camera systems ability see into shadow and highlight areas of a scene and render adequate detail. Dynamic Range can be measured using a waveform monitor, a histogram or a light meter. When shooting for broadcast, the NTSC has strict specifications for how dynamic range is broadcasted. A waveform monitor displays 5 stops of exposure ranging from 0 – 100%. So where does the 10 stops come in?
Latitude is related to Dynamic Range, but it is also scene dependent. Latitude is the degree to which you can over or under expose a scene and be able to bring it back to a usable exposure value after recording. It is dependent upon dynamic range, which is going to set the overall boundary by how much you can over and under expose, but it’s limited by the scene too, and how bright and dark the scene itself goes (lighting Ratio).
If anyone has ever actually shot with a modern VIDEO, HD, HDSLR camera, they would know that by just bumping the aperture ring will change the exposure of a scene enough to warrant correction. If you bumped the aperture ring, one way or another, and the image still looks fine then you are within the latitude of you camera. I doubt that you can change the aperture setting 5 stops, one way or the other, and still render a satisfactorily exposed image.
Three Point Lighting – What They Didn’t Tell You!
The concept of “Three Point Lighting” has been a topic of contention with me for the last 20 years! Unfortunately the term “Three Point Lighting”, and the method, has been around so long that it has become the norm. I cringe every time I hear the term muttered. This approach has been a simple way to explain lighting but falls short in the long run when it is actually applied.
This lame concept of how to light a scene is running ramped on the Internet furthering the spread of misinformation. I can appreciate the attempt of someone wanting to help, but at one point this type of misinformation only confuses and limits the person who is serious about his or her craft and truly wants to learn. As with all contagious diseases, the spread of this misinformation also has a trickle down effect that includes other less obvious aspects of lighting, which I will touch on later in this tip.
I use the term misinformation because some of what is being taught can, when used correctly, be somewhat helpful. Before we can decide on what type of lighting setup would be best for our scene, we need to first define the scene and how the end result should look. It is not as simple as following a general diagram or rule for “Three Point Lighting.” Even for a one-person interview, we need to evaluate several elements before setting up our lights.
Some elements of concern may include whether the subject is of large stature or of slight stature. This element might determine what focal length lens should be used to flatter the subject, which will make a difference in the depth of field, which will alter what f-stop needs to be used, which will determine how much light output will be needed to maintain that aperture and depth of field.
This is especially important for those shooting on 35mm format HD cameras where, at six feet from the subject, a 50mm lens at f-4 will render a depth of field of approximately one and a half feet. If your subject leans forward during the interview, he can go out of focus.
In order to understand how much wattage of light output would be needed for each light in your setup, Three Point or otherwise, you will need to have a better understanding of Footcandles and Photometrics. We are now beginning to see the trickle down effects of misinformation. Lighting is not as simple as just setting up three lights from the most inexpensive kit we can find.
Now, when is Three Point Lighting not Three Point Lighting? When you need to add more lights to shape the scene. I find that most who follow Internet chats, blogs and how-to-videos, which really don’t show how-to correctly, are under the impression that having abundance of light is the prime objective of lighting, it isn’t, establishing quality of light is!
Before continuing with Three Point Lighting, let’s look at other elements that may alter your perception of how to light.
Once you have decided which lights get diffusion and what density of diffusion goes on each light, you may find that you don’t have as much light as you thought. You may need to increase your light kit to include higher output lights as well as different types of lighting instruments.
Many times, one-person interviews are conducted on location and in an environment that might add interest to the scene. With this in mind, you will need to set up a key light based on assessed elements then, you will set up a fill light to achieve the lighting ratio you have decided to use for this interview. All other lights are set up to accommodate the f-stop setting you have decided to use.
Other lights needed for the same scene may include, a shoulder light (referred to as the backlight in Three Point…), a rake or kicker (also referred to as the backlight Three Point…) or a shoulder or hair light (also referred to as the backlight Three Point…). A background light, or lights, (also referred to as the backlight Three Point…) can be used to illuminate the background. How is the term Three Point Lighting working for you up to now? Without a definitive description of what each tool will do, this can get confusing.
Once the subject is lit, we should light overt objects in the scene. Overt objects can include a vase of flowers, a row of books, curtains, or even a hallway. It is important that you light the background in order to render dimension to the scene.
We can easily end up with Five or Six Point Lighting just for an interview. I realize that the Three Point concept was meant to introduce a starting point but, it has become the rule and this is the misinformation I am referring to.
OK, so let’s say you have just perfected lighting a one-person interview and you are on to lighting a larger area with multiple subjects. This can be a medical facility with doctors in the foreground with the staff in the background area. Are you going to set up the key light to the front of the room at a 45 degree angle to cover the entire area and then add the fill light to the other side of the room with a third light aimed at the backs of the doctors? Does this equate to Three Point Lighting? The truth is, even if you intend to practice the Three Point Lighting approach, you need to add that approach to every subject or group of subjects that are in your scene.
So, if you have nurses at a station in the background, plus other staff talking in a different area in the background, you will need to add the Three Point Lighting concept to each area of the scene. This means, to correctly light this scene, you will need at least nine lights with the appropriate wattage output needed to reach each subject area and still maintain your established contrast range, lighting ratio and f-setting. You will also need to find enough amperage to power these lights. This can be a scene from a small feature, a Documentary, a TV commercial or a virtual tour for a website.
As professionals, or aspiring professionals in a highly visual field, the common denominator is the finished product. Does the scene look believable or does it look like a deer in the headlights? How can people teach lighting (as seen all over the internet) when the examples they show are just not lit correctly? Trust your eyes, if the example does not look like what you would expect to see on a leading TV drama or movie, then there is something wrong with the example. I urge you to look at the works of Master Painters, Photographers and DP’s to see what lighting should look like and use those examples as a reference.
See our tip, What’s Your Lighting Style?
With this tip, it is obvious see I mention (in other tips) that a light kit for a Documentary or a local feature would consist of, at the very least, eight to ten thousand watts of Light.
*If the elements and some of the terms are confusing, Our “Lighting For Video Film Style” DVD explains this approach in detail.
Lighting For HDSLRs • ISO Effectiveness
Video (HD) or DSLR camera ISO ratings essentially represent the gain of the camera. The higher the ISO, regardless of the optimum suggested ISO for specific cameras, the more the image will result in higher contrast, more noise and less resolution. When shooting video with a DSLR camera, 400 ISO would be the highest gain you can use before you begin to experience a degraded image. Cameras with 4-K sensors can boast a high ISO of 800 due to the size of the sensor, which is capable of rendering enormous file sizes and therefore making the degraded image less detectable.
So unless you are shooting with 4-K resolution cameras, I suggest running tests to see just what the image will look like, shot at a specific ISO rating, once it is edited.
Most video cameras produced today, that have a fixed ISO, have an average equivalent ISO of 400 at 0 – db gain under tungsten light at 18% gray reflectance. Percentage of reflectance is the key motivator in determining how you rate your camera.
Let’s put everything into perspective; Traditional Beta SP cameras had an ISO rating of around 400 at 18% gray. When Mini DV cameras appeared they were advertised as having more sensitivity and not needing much light! In reality, the internal gains of these cameras were raised to be more light sensitive, which also rendered higher contrast, and more noise. Lighting manufactures reacted to the claims of not need much light by offering “DV Light Kits” that offered one or two small wattage instrument in a small easy to carry case.
Needless to say, this approach was great for news shooters who were merely looking for illumination, but didn’t do much for those who were looking for beautiful production lighting. These mini kits eventually ran their course and newer mouse traps began to emerge. Flo banks became popular, as now are LED lighting instruments. With the howl for the need of more energy efficient lighting becoming increasingly loader, the attention to the cinematic craft and approach is becoming extinct.
In the rush to answer the call from videographers for lighter, more compact, more energy efficient lighting sources, the industry has ignored some vital basic fundamentals.
High Definition cameras need more light, not less light in order to produce a more cinematic look! When I say more light, I am not referring to the output of a naked tungsten bulb, Flo bank or LED fixture focused point blank on someone’s face so there is adequate illumination to record an image; I am referring to having a light source that once the reflectance of the subject and the balance of a scene is established and the appropriate f or T setting is determined, the light source can be set to a preferred distance to allow the scripted action to take place while the quality of the image remains constant. If you are shooting in DSLR format with 35mm lenses, you need to choose wisely! In most cases a small wattage tungsten source or an out-of-the-box Flo bank or LED light will never work.
I suggest you spend time viewing behind the scenes footage from major motion picture productions to see what it takes to light a set. Since the same HD cameras are now being shared by various TV and movie production crews, it is evident that the same look can be obtained if lit in the same manner.
First, one must realize that in order to produce an image that will suffice as what is often referred to as the illusive “Film Look” you must apply the craft, the approach and the tools that are needed to produce such a look. Ignorance of the craft while following a popular industry fad will do little to help you perfect the image you are looking for.
Second, since all lighting sources are tools of the trade, it is important to use the right tool for the right job. In order to create a look that is vital to a script or program need, you must choose the light source that fits the need. Every light source affects the image in front of the camera differently. Choosing an electronic light source such as a Flo bank or LED merely because it is light weight and small may not render the look best suited for your script. The color spikes associated with modern electronic lighting can cast an unsuitable light on your talent and render the scene differently than anticipated.
While tungsten, is a hot and inefficient source, it still renders the most pleasing light when photographing people than any other source. In addition, tungsten sources come in a variety of different type of globes (or bulbs) and heads that include projecting a beam longer distances when needed or rendering a gentle, soft shallow light for more intimate applications. Tungsten lights are the most affordable and versatile sources on the market today!
However, depending on the type of production, many situations lend themselves perfectly to using an electronic light source. Flo Banks have come a long way since their introduction with bulbs being far more color accurate than what they used to be, making them a great key light source when light to subject distance is an issue.
They can be mixed with other sources, such as tungsten or daylight, either as a key light or as a fill to enhance a scene. They blend perfectly with modern day exterior or interior lighting as a way to match existing lighting. Don’t forget, they emit a hard electronic light and in most cases need to be diffused so, if you are going to diffuse them, you may want to choose a higher wattage fixture than first estimated.
You should always review the photo metrics of a light source before purchasing or renting equipment to make sure they will serve your purpose. Don’t forget to figure in light loss due to diffusion, environment and light to subject distance.
The quality of light used on a shoot alters the look of the image in front of the camera. Diffusion should be applied to a light sources according to the subject that is being shot. Diffusion, when used appropriately, can soften the image without degrading the resolution of the lens, and without adding flare as some camera diffusion filters do.
When a light is diffused correctly, the light will wrap the subject in a natural way eliminating severe, shadow lines and harsh highlights. When lighting sources are diffused correctly, we will experience a number affects that we should keep in mind.
- You can lose one to two stops (or more) of light output. With this in mind you will need to choose a source that is 1 – 2 stops brighter than what you would normally use without diffusion. So, if you normally use a 1000 watt light as a Key light, and you lose a stop of light through diffusion, then you will need 2000watts to start with to maintain the same f-setting you started with before adding the diffusion.
- Now, we need to understand how to light a scene before we can go any further with the discussion of lighting. If you are one of those who show up at a location and set up what ever light you felt like bringing that day and then set the camera to auto iris or auto exposure and then shoot at the first indication of adequate light to make an exposure or if you are one of those “New Generation Shooters” who boast they don’t need light because the new camera’s don’t need it then there is a lot to be learned. Especially if you are shooting with 35mm format lenses.
- Essentially, there are a few elements that need to be addressed even before you leave to go to your shoot! Since maximum sharpness and resolution of a lens is found in the middle apertures, to shoot using the widest stops found at the top of a lens, will render mediocre sharpness and low resolution.
As a DP looking to shoot with the maximum sharpness and resolution, you should think more about shooting at f-4. This stop will render adequate sharpness and resolution and still render a shallow depth of field. Now, if shooting with a 50mm lens at f-4 with a 35mm format camera, realize that at 10 ft. you will have approximately 2 feet depth of field. Not only might you need to pull focus with any camera move or talent action, you will need to light the scene for f-4.
The realty is, if you are entering into the 35mm realm of shooting you are going to need to start thinking about lighting on a totally different level. A 650 watt light, regardless of the source (Quartz, LED, FLO) once properly diffused, will not cut it as a key light for an interview, let alone for any kind of larger set. You will need lights that can output enough light, once properly diffused, to render your needed exposure of f-4. That means that depending on how far away your light is from your subject and how much diffusion you are adding, you may need to start with a 2000 watt output light source so you can properly diffuse it, locate it where it needs to be in distance in your scene (especially if you intend to use a dolly) and still derive at your needed exposure of f-4.
I very much doubt that you will be able to do this with a 650 LED or a small Flo Bank!
A Little About Photometrics
Most lighting manufacturers include a photometrics guide with their particular lights. Photometrics are established under perfect test conditions that include proper voltage and bulbs and in a test environment. Photometric Guides are just that, guides!
Since we shoot in a variety of environments, photometrics can change so, you should test your lights before taking them on a job. What most of us do not take into consideration when purchasing
lighting is the fact that after we purchase the lights, we then alter them with soft boxes or other accessories that change the photometrics. We can very well end up with a fraction of the amount of light we thought we were going to have.
LED & Flo Lights
Instead of being sucked into an indiscriminate blog or posting on an industry chat board by an inexperienced first timer about the latest trend in lighting, and which is usually that you don’t need to light a scene with new generation cameras, you need to face reality!
I have been hearing this excuse for being ignorant, or just being plain cheap, for the last twenty years! The video production field is a very expensive field to be in. If you don’t have the capital to get into it properly, maybe you need to choose a less costly vocation?
Regardless of what any lighting sales pitch may want you to believe or what the wishful thinking is; we are all faced with the same dilemmas when it comes to choosing which lights we should purchase.
The industry has always been trying to develop an energy efficient, high output, compact & lightweight light source that burns cooler than quartz. This type of lighting is readily available on today’s market but once we add “quality” of light output and cost effectiveness as added elements, it changes how we need to look at those special application lights.
Flo Banks and LEDs offer high efficiency but with low light output. Depending on the fixture output and when properly diffused (and they do need to be diffused when used as a key light) these lights will hold a pleasing contrast ratio, but only for up to five feet. They are most suited for close quartered environments such as small offices, one or two person interviews, and special applications.
However, this type of electronic lighting can render a subject less flattering than the industry standard quartz does due to an electronic ballast, and limited color spectrum. You need to make the decision as to what element is more important. Many environments such as hospitals, schools, and office buildings are friendly to this type of lighting and all you normally would need to do is balance the color and blend the ratios with the existing luminance.
When creating a new lighting scheme in an environment that lacks the needed luminance and motivation, then you will need to forgo efficiency and run with the big guns!
You can refer to the “Lighting For Video Film Style DVD,” which covers how to use photometrics and foot-candles to establish a workable lighting blueprint for any type scenario, as a reference.
About LEDs
OK, as for LED lighting! The Light Emitting Diode (LED) was originally developed for a specific use. LED’s produce a light that, when looked directly into, would be visible in brightly lit areas or in daylight, (high lumens output at the source). These are perfect when used in traffic lights or rear stopping lights on vehicles when a caution or warning signal is needed. LEDs were also used as indicators in control panels.
High-Power LEDs are now being used to produce lighting instruments for use in video production. Since LED’s draw very little voltage and they burn very cool, they seem to be the new kid on the block! But, as I have always tried to instill in all my seminars; lighting instruments are tools and no one tool is going to do every job well. As an independent producer, it would be very difficult and expensive to own every tool that is on the market; sometimes it may be wise to just rent a special tool when needed.
Right now LED lighting is getting a boost in popularity by media because they are still new, but there are some issues to be aware of. LED’s are wonderful as effects lights on stage and on screen when used in the background and when they are directed toward the camera or audience. LED’s display hi lumens output at the source and are very intense when looking directly into them. But as a key or fill light, they still need a bit more development. Manufacturers tend to exaggerate the output of these lights much like Auto companies exaggerate MPG as away to upsell a vehicle.
The flat panels are a great solution when shooting in close quarters or confined areas such as inside vehicles, boats or any place you may be in need of a “stick-up” type lighting unit. As far as using them as key-lights or as fill, they may not deliver the output of light you are looking for when they are five feet or more from the subject.
To illustrate; if you are shooting with an HDSLR with a 50mm lens, at a distance of 10 feet from your subject, at f-4 you will have approximately 2 feet Depth Of Field. At an estimated 400 ISO, you would need approximately 180 foot-candles or a 1000 watt tungsten fixture key light that is properly diffused, set at approximately 6 feet from subject, to render enough light for f-4 to ensure having enough Depth Of Field for your shot.
To get the same look and output from an LED 1’x1’ fixture, you would need about 4 LED fixtures in the flood mode, ganged together and diffused in order to have the equivalent of the 1-K soft source. LED sources desperately need diffusion if used for lighting people in close ups or interviews.
This is not a logical way to approach this type of shoot. On the other hand, since they do not have adequate light throw, these are perfect for lighting scenes with pools of light while preventing unwanted spill on a set.
Bottom line? Know what tools you are going to need for each job and thoroughly test the tool at a rental house to see if it is the right tool for the job. Did you bring your light meter?
Lighting For High Definition Formats
First off, lighting is not a symptom that needs to be cured; it is a craft that needs to be practiced.
Every time a new media capture format is developed or promoted, the question as to how to light for it follows. Understanding how to light a scene when being captured to a chip is a bit different than lighting for a film format. This approach applies to filmmakers (video-makers), and still photographers who are now shooting on a digital format.
Lighting for the chip takes a little bit of re-understanding lighting from what has been taught as the norm. Very few sales people behind the counter and even less lighting manufacturers really truly understand the lighting approach needed for High Definition formats. Sales people want to cling to what they learn from manufacturer’s advertising especially when it comes to latitude and exposure range, which in many cases, are very misunderstood.
When lighting for HD, it is important to preserve high light detail. Even if HD cameras have excessive latitude and 10 stops of exposure range, you are going to experience difficulty maintaining high light detail if you do not light a scene correctly.
When you light a scene, whether it is indoors or outdoors, if you do not have detail in the bright areas when you shoot a scene, you will not have detail in the bright areas of that scene when you go to edit. Of course, if this is your intent then you are all set. If this isn’t your intent, then you need to control the contrast levels with lighting before you shoot. One way to do this is to use a light meter as a way of referencing exposure levels in a scene.
You may have heard or read that if you shoot video you don’t need a light meter; the truth is it is called a light meter NOT a video meter. A light meter has nothing to do with the camera being used. Unlike zebras or a waveform monitor, a light meter will indicate how much over or under exposure a specific area is with-in a scene compared to the Key Light exposure.
You can read more about the light meter further down in lighting tips, and there is a full chapter dedicated to using a light meter in our “Lighting For Video Film Style-DVD.”
Since the chip is made up of pixels, that are sharp and uniform in size and shape, they render detail of a scene with sharpness and high contrast. This sharpness effects detail of a subject and other objects within a scene. The pixel contrast is evident when a high light area meets a shadow area and the shadow line looks hard and sharp. It is also evident when the high light detail of a scene is totally blown out.
I was recently hired to light a set for an inexperienced director who had just purchased a new HD camera. His approach was to light the talent for a lawyer TV spot with point blank, undiffused light which created hard shadows on the talent and on the background that created all kinds of problems that took hours to overcome. When I questioned him on what he was trying to achieve, he said he wanted a “Film Noir” look!
From Wikipedia
“Film noir” is a cinematic term used primarily to describe stylish Hollywood crime dramas, particularly those that emphasize moral ambiguity and sexual motivation.
OK, anyone who uses this term as an excuse for not knowing how to light a scene should, at the very least, not be taken seriously. When I suggested a softer approach, he angrily yelled, “who wrote those rules”. I retorted with “Rembrandt, Vermeer, Caravaggio!” He returned with, who are they?
This brings us to another issue. Artists from hundreds of years ago, who were trained to interpret light, were able to capture a mood and a look that inspires today’s artists. However, this look of realism seems to be out of reach for most of us today who shoot on the latest digital and HD formats, edit on tricked out computers and who use state of the art software. I suggest researching the artists mentioned, as well as other artists, to get a reference as to what lighting can look like. Then spend time referencing still photographers and Directors of Photography who have done work that you have admired.
Simply put, great lighting is the digital equalizer!
“Diffusion filters over the lens of a camera lowers resolution, lowers contrast and can cause flare” – Ira Tiffen
You can actually achieve a softer image, while maintaining contrast, color, and resolution by lighting a scene correctly. The most important element in any scene is lighting. But, great lighting merely renders a look for the script and the performance of the talent. You need to get a scene lit in a short amount of time so that attention can be directed toward the camera, the script and the performance. Learning to light accurately AND quickly is part of the same job. Additionally, learning to light accurately and quickly lowers the stress level on a set and actually adds a pleasantness of being in the production business. This means that the production shouldn’t come to a screeching halt when it is time to light a scene.
Remember above all; protect the high light detail within your scene. You may even choose to under expose your scene by one-third stop in order to preserve the detail in the high lights and then raise the levels when editing. Keeping in mind; smaller, sharper lights will add contrast to a scene and cause the loss of high light detail, while larger softer lights will lower contrast and will preserve high light detail.
Many lighting manufacturers still have not yet grasped this concept. I have even heard lighting manufacturers sales reps make comments like, if you are going to diffuse a light, why not just use a smaller wattage unit. This is the voice of ignorance speaking. The great artists painted their subjects by using North light coming through large ten-foot studio windows to achieve a warm, soft, but natural look that has survived to this day. Hmmm, large soft sources? That’s a concept!
Lighting An Outdoor Scene At Night
Lighting at night is relatively simple compared to lighting during the day, or for interiors because everyone has a similar expectation for lighting at night. Basically, outside at night is dark! You expect to see shadows with pools of light illuminating the subjects.
So depending on the script, you normally won’t need giant lighting fixtures, like 10K’s, unless you are intending to light a large area like a football field and even then football fields are already lit. You can use smaller wattage tungsten fixtures that can be placed to create pools of shadow and highlight. 1K & 2K lights will work well.
As your subjects make their way through the scene, they might enter an area of light and then maybe walk through a shadow area, much like they are walking from streetlight to streetlight.
If you are shooting a scene at a location where there are no street lights to motivate the light from, you can create the light using your lights but you will need high stands.
Consider the format that you are shooting on and remember what we teach in our lighting class about soft sources. Even though night scenes will have more contrast and will have a harder look; that harder look should be created by using softer light than just a bare bulb. Remember, we are lighting for the chip! Shadows areas may need to be slightly filled, but not over lit, in order to capture detail.
Some Things To Remember When Lighting At Night
Consider ambient light from store signs, street lights or car headlights. Balance your exposure so that the background lighting does not exceed the exposure range of your media. That means; highlights in the background can be so over exposed that they can far exceed what your camera is capable of capturing. Anything more than a few specular hits spiking above 100% can cause unwanted flare or noise. Use your spot, light meter to read ambient light levels.
Light your subjects so that the shadows are toward the camera. This will add to the dramatic, night-time effect. Avoid lighting from your camera position,this will render a flat image. Your fill should be slight so as not to ruin the nighttime effect. When coming in for a close up, you will model the light so that shadows not as full. We need to see the eyes of the characters while still looking natural.
Backgrounds need to be lit in layers to bring out contours or silhouettes of the environment. We don’t need to see detail in the background unless the script calls for it. Putting smaller fixtures behind elements will separate the background. For instance, you may need a large light to illuminate a dumpster in an alley to represent a street light overhead if we need to see the detail of the dumpster as a player, but we can use a smaller fixture to put a burst of light on the wall behind the dumpster giving it a silhouette if we are not playing the dumpster but would like to include it in the background.
When lighting large, wide shots at night, you will still need to separate the foreground from the background. If you have roof lines, you may want to use 2Ks to illuminate trees behind a house so that a roof line silhouettes against them. If there are arches or a tunnel in your scene, you can light the inside of an arch or the background of the far end of the tunnel with out needing to light the entire tunnel or corridor.
Street scenes at night always look better when hosed down so that lights can reflect off the street. You will need to choose a camera height that will accentuate the look you need. When lighting an action scene at night, you can move your lighting with the action. Either mount your lights to a dolly or a cart that can be moved with the talent or have a grip carry it. Hope some of these suggestions will help when shooting at night. If you find other references, please forward them along.
Lighting For A Feature Shot on HD & Mini DV
This topic is very complicated to discuss since making a feature is not like shooting your average corporate video. I can’t really get into detail since it would mean writing a book, but I hope these tips will help.
To begin, lighting a feature is different from corporate or commercial projects. For a corporate project, we might set up our lighting first and then place the subject or subjects within it. When lighting for a feature or documentary re-enactment, we need to light for the script.
This means, if you are hired by a director or producer to DP and/or to light a feature, you must get a script and you must read it carefully. If storyboards are available, get those too. You and the director must agree with how the scenes are to look. You must determine the feel or mood for each scene and location and what the director expects the audience to feel when watching the movie. It doesn’t matter what the budget is!
Next, determine what equipment you will need to light each location. This can be done by reviewing the size of the space for each location and then following the principles mentioned in our Lighting Class and DVD for choosing lights. You can do this by using the conversion charts supplied with the class workbook. If you haven’t purchased our DVD as yet; simply put, you will need to evaluate, in foot-candles, what each location will demand for shooting with a particular aperture setting and match that output to the lights that you will be using. By doing this well ahead of the shoot date, you can determine what lights you might need to rent or borrow.
Even though the shooting schedule might be tight, the crew small and the budget low, you still must maintain the overall quality of the lighting throughout the entire movie. If you are limited by budget, crew and lighting equipment, you must plan a look from the start, that will accommodate your resources. So, don’t plan complicated setups if you won’t have the time, equipment or crew to pull them off the right way. You may need to convince the director to broaden, but not limit, his expectations of his vision in order to render a pleasing mood throughout the entire script. You can
remind him that the other alternatives to rendering the scenes, as he would like them, may be to increase the budget, extend the shoot time and get a larger crew.
I have found that when shooting a feature (especially a low budget on HD or Mini-DV) the amount of lighting and grip equipment ends up being a lot more than what might be expected so, we need to be prepared for the unexpected. You should think in terms of needing at least 8,000 – 10,000 watts of tungsten light to start with for a “no” budget feature on mini DV and at the very least a 3-ton grip truck with an extensive tungsten package for a low budget feature shot on HD, rather than thinking that a light kit with 2500 watts will do the trick.
You will need power distribution at each location as well. So, be sure to check each location to see if you have enough power to use the lights you are bringing.
8,000 Watts of light will need at least 4 – 20 amp circuits. Other considerations for power includes renting a generator or doing a “Tie-in”, if time and budget allow. The type of lighting instruments needed for each location and setup should also be determined prior to the shoot. You can rent special application lights like Flo-Banks or HMI’s for specific shoot days and can be returned when that location is wrapped.
Next, after reading the script, determine what daylight fixtures you might need and what you might need in grip equipment for both indoor and outdoor locations. When setting up outdoors, I have noticed that some of us forget to consider any other lighting but the sun, but that is a mistake. On a bright day you may need butterfly silks, along with 4’X4’ silks to diffuse the sunlight and shiny boards to reflect it. On an overcast day the sun may not be intense enough to use a reflector with, so you may need to rent HMI lighting. Depending on the output of light needed, you may also need a generator.
Don’t forget to bring enough sandbags to the location. I know this sounds a bit silly, but without enough weight on stands outdoors, one gust of wind can send an entire set sailing, and sandbags are cheap to rent.
Remember; on a feature you will have many setups to do in a very limited amount of time, so the more you can prepare for each location with floor plans and lighting diagrams, the faster and more accurate you will light.
Lighting A Green Or Blue Screen
How to properly light talent in front of a green screen is one of the most asked questions that I get. When lighting a green screen, the screen should be at least 4 feet behind the subject, the more distance the better, and lit with an even soft source. I have noticed that many stations have hard bright lights on a green screen which causes most of the problems they encounter. I compare lighting a green screen to using a garden hose. If you stand near a wall and set the hose nozzle to get a hard spray, it will splash back drenching you with water. If you set the nozzle to a soft spray you can wash the wall without any of the spray reaching you.
Light reacts much the same way, the harder you light the green or blue screen, the more splash of color you will get on your talent. So, we need to diffuse the light hitting the green screen and light it evenly.
You should then be able to light the talent any way you want as long as the shadows do not hit the background. This should not be a problem if the talent is far enough away from the screen.
For exposure, the luminance of the green screen should render the same setting as your key light being used for your subject or you can take the background down one half stop darker than the key if you prefer. Just remember to avoid overexposing the background and you should have a nice clean key.
More On The “Film Look”
I often get emails asking how to light a scene in order to get the “FILM LOOK” I would like to begin by saying that the “FILM LOOK” that everyone is trying to achieve can only be obtained by actually shooting film since the “Look” is derived from the chemical process that takes place within the structure of the film its-self. But, the next best thing is to achieve a beautiful, soft image on DV or HD that is so inviting that people will perceive it as something other than video.
Getting a great looking image on video is a culmination of a few different elements. If we are going to try to get a film look, we will need to approach shooting a scene “Film Style”! Here are a few elements to remember.
-
Every setup dictates a proper focal length lens.
-
Will the camera be moving or is it a static, tripod planted firmly on the ground, shot?
-
Are there enough different shots planned to accommodate the needed coverage?
-
Do you have the right type and wattage lights to cover the area you are shooting in?
-
Are the light sources diffused and color corrected properly?
-
Have you established the ISO or working speed of your particular camera so that a light meter can be use to establish exposure levels?
-
Do we fully understand exposure control and are we familiar with the aspects of lighting that can effect exposure?
-
Do we have enough time to set up the needed lights and do we have the right tools or lights for the job?
These are elements that should be addressed in order to successfully obtain the “Film Look” or any other desired look. Our DVD covers these topics and more. Once you have studied the information on the DVD and answered the questions in the workbook, we can then discuss the approach to lighting for “FILM LOOK “ (one-on-one) over the phone.
Using Light Meters
Any light meter that can read incident and reflective light will work when lighting for video. It can even be a photography meter, but choose a digital meter that displays the f-stops. This will allow you to read the meter quickly. I use a Sekonic 558 meter because it reads incident light and has a spot attachment built-in to read reflective light. I also recommend the Gossen Digital Luna Pro. It is the less expensive of the meters and is very small and compact and is just as accurate.
When using a light meter, it doesn’t matter what format camera you are shooting with. To calibrate the meter accordingly. You must refer to your owners manual to get the lux rating of your camera. With most new cameras, the sensitivity will be f-11 @ 2000 lux. If your camera sensitivity is f-11@2000 lux, set your meter at ISO 800 when shooting indoors and at ISO 500 when changing the color wheel filter for shooting outdoors. If you have an older camera that has a lux rating of f-8 @ 2000 lux, then your ISO will be 400 indoors and ISO 250 out doors. You will need to enter the ISO
information into the meter along with the shutter speed (or frame rate if the meter is made for cine or Motion picture). The shutter speed is normally 1/60. ISO + Shutter Speed = f-stop.
You will get a difference between the incident and reflective because the incident measures the light coming from a source and renders it as 18% gray. So what you are reading, when using an incident meter, is the uninterrupted light output that is reaching your subject at a specific distance (which is also foot-candles). Reflective readings render the amount of light that the camera will be sensitive to AFTER it is altered by the color or density of whatever it reflects off of. Darker tones will render a reading that will indicate that you should use a wider aperture setting while lighter tones will render a reading that will indicate that you use a smaller aperture setting. This is because the meter assumes you want, whatever you point it at to be
18% gray or the same as your key or subject light.
We are also able to use a spot meter to read luminance on a set. Once we establish, with our incident meter, what f-stop our key light will be set at, in order to render our subject at 18% gray or let’s say 80% on a waveform monitor, all we need to do to be able to control other reflective light in a scene is to measure it with a spot meter and adjust it’s output until it matches that of the key light or slightly over or under as desired.
By understanding the contrast range and capabilities of the format camera that you are using, and then using a light meter to measure the ratios of a scene, you will be able to control the high lights and shadows scene to scene so that little adjustment will be needed to be done in post.
Converting “Minimum Lux” to ISO
Trying to figure the ISO for a mini DV camera when all the manual gives as a reference is a minimum lux can be a bit confusing, so here is some math to help figure out what the ISO may be.
Using my camera’s sensitivity of f-11@ 2000 lux and it’s established ISO of 800 as a reference, we can illustrate how to find the ISO from a minimum lux rated camera.
If we already know that f-11@ 2000 lux is the maximum illumination for an 800 ISO camera, and we want to find out at what f-stop and lux rating my minimum illumination is for that same camera, all we need to do is run down the math as follows:
-
2000 lux = f-11
-
1000 lux = f-8
-
500 lux = f-5.6
-
250 lux = f-4
-
125 lux = f-2.8
-
60 lux = f-2
-
30 lux = 1.6
-
15 lux = 1.6 with 6db of gain (every 6 db of gain = 1 stop)
-
8 lux = 1.6 with 12 db of gain
-
4 lux = 1.6 with 18 db of gain
It seems to me that If I were to include my maximum gain setting of 18db as part of my minimum illumination, my 800 ISO speed camera would have a minimum illumination of approximately 4 lux which would put a minimum illumination of 3 -5 lux. Our example is pretty darn close, if not exact.
Choosing A Basic Light Kit
The question regarding “what is a good, general light kit” is a common one and the answer is one that is sometimes a little different for each person depending on budget and need. First I suggest that you choose lighting that will last and that you can build from and not need to replace often. So, buying quality equipment from the start is important, even if you start with less and add to it later. Unlike cameras, computers and software, lighting and grip equipment hold their value.
You are most likely able to get back what you paid for quality lighting and grip equipment, if you ever need to sell them later. You can’t say that about digital equipment. It is almost like we need to think of cameras as being expendable and lighting and grip equipment as being permanent.
The sooner you put a good light kit together, the sooner you can begin to do the kind of work companies are willing to pay more for!
In our class, we demonstrate using an ARRI SoftBank I kit. This kit contains (1) 1000 watt open face light with a small Chimera soft box, (2) 650 watt fresnels, (1) 300 watt fresnel barn doors and steel scrims (full doubles, full singles, half doubles, half singles) and light stands.
In time you may want to add an additional ARRI 300 watt fresnel w/barn doors, scrims and stand and maybe a Source 4 Junior by a company called ETC, or the like.
In addition to a light kit, there is an array of grip equipment that you will need to add at sometime to compliment your light kit (C-stands, grip arms, flags, nets, silks, ceiling clamps etc.). I like the “Bogen/Avenger” line because they are made to hold up under heavy use and the machining of the grip equipment is of very high quality. This will make up a basic but fundamental light kit for handling most small jobs that you might encounter.
The largest problem in lighting is created by those who do not know how to light. If you use a hard, or undiffused light, you will create unwanted contrast and shadows. You will not be able to correct this problem by merely placing a diffusion filter over the lens.
KNOW THIS! DV needs as much light as any other video format if you are lighting an image correctly. The rule of thumb that we teach in our class is that you start out with a 1 stop, higher wattage key light source, than you think you need, so that by time it is diffused, you still have enough light to shoot at a decent f-stop with. Every time you add a layer of heavy diffusion to a light, you will lose about a stop of exposure. So you will need to have enough light to begin with before you can diffuse it.
I recently had the opportunity to try out the “BARGER-LITE.” This is the perfect key light. And, it will go great with the ARRI soft kit, as the optimum combination. The “BARGER-LITE GT-3” holds (3) 650 watt bulbs on a small 13”x13” square, flat face fixture that is 2” thick. It is very small and compact. The GE FCM 650W lamps, that can be obtained for the unit, put out more light than a conventional 650W bulb so you end up with about 2800 watts of light when all three lights are on. Each lamp has it’s own switch and when the entire fixture is on, it only draws 15 amps.
The advantage of this light is that the bulbs throw a soft, gentle light and once the key is set (using one or two of the lamps in a soft box) and you need to move back for a larger shot, you can accommodate the light loss by clicking on another lamp. This will save time when need to switch out to a larger light . The fixture is very rugged and is made to accept a number of different size soft boxes, which is great when you need to be versatile with your lighting setups.
You can access the companies mentioned by going to our sponsor page and clicking on to their logo.
Assessing Set-up time for A “Run & Gun” Shoot
This tip is primarily directed toward producers who are constantly insisting that the production team move faster when setting up lighting for a scene. Even though we work in a high pressure field and most of the time under unrealistic time deadlines, it is important that the producer on a set has a full understanding for what it takes to light and shoot a job correctly. The fact is, no crew wants to take any longer to set up than what is necessary. But all producers need to understand that we live in a physical world and not a make-believe world.
It is not the crew’s fault that the producer did not schedule enough time to light and shoot a job correctly. A producer’s job is to assess the needs of a production and then plan a realistic approach and budget to accommodate those needs. trying to squeeze a two day job into a one day shoot and then pressuring an under staffed crew to perform the task of “saving the shoot,” is not only unprofessional, but in most cases, will contribute to the end product being of inferior quality which is then, also sometimes blamed on the crew.
When we pull up to a job site, we will first need to unload the vehicle and load the gear into the location. This could take 20 minutes to a half hour for a small “run and gun” shoot depending on how much gear we have and how many are on the crew.
As a reference, time yourself and see in minutes how long it takes to open a light case, set a stand in place, go back to the kit for another light and then put it on the stand and affix the proper barn doors, diffusion or softbox. Now do this with the other 3 or 4 lights that you brought and now run the appropriate cabling for power to each light.
Now let’s begin setting the camera on the tripod, loading tape and running bars. Now, set up a monitor and start running back and forth to it as you adjust the lighting ( We can eliminate this “monitor shuffle” by using a light meter). OK, now look at your watch; How long did that take? Approximately 20-30 minutes to unload and park the car with about another 30 minutes to set up the first interview. And this is a small set!
An average interview set up just cannot happen in 10 minutes! Now, do you want quality with that, and is there time to adjust the lights once the talent gets in place? If you are using a standing to set lights to, it will help if the clothing, complexion, hair color and height of the standin can match that of the actual subject. Otherwise, you will need to re-light once the talent gets into place.
If I am doing a full blown production shoot with a 3 ton grip truck and full camera package (audio, dolly, track etc.) depending on the amount of crew (usually 3 – 4 plus myself) and the access to the location, we figure at least 2 hours for load-in and setup of the first shot. After that, the time per shot in the same location drops to about half once the equipment has been loaded into the site. To cut the setup time, you may want to talk the producer into budgeting for one other person more than your usual crew. This other person can pick up the pace considerably and move the shoot-day along as needed.
Try to plan the schedule with built in time for travel, set up & breakdown and bathroom breaks (other kinds of sub-contractors, like plumbers and painters, even get occasional breaks while on the job). Make sure the crew is treated with respect and are fed properly. A happy and energetic crew will accomplish more in a day than a resentful one.
Are You A Shooter Or A DP?
I often hear Videographers referred to as “shooters.” I don’t know what that term means? A camera operator (camera-op) or camera-person is one who operates a camera in a studio or on location for an event and is linked to a director who gives instructions as to how to set framing etc. A stringer or news shooter usually runs out with a camera on his or her shoulder and shoots what is in front of the lens with no regard for lighting. OK, I know this isn’t true, but that is what it sounds like. With all the talk about film look, film this and film that, isn’t it time that the title of DP, or Director of Photography, be given to those who coordinate the camera setups with the lighting and then render the overall look of the scene regardless of what camera is being used? Yes!
So from now on, and if it appeals to you, you can refer to yourself as a video DP. By the way, in the future we will address the topic of a Video Camera AC (or Camera Assistant). Just because we choose to shoot on video rather than on film does not mean that a camera assistant is no longer needed. As a rule, no matter what the format, I include a Camera AC (who is checked out on the particular camera being used) on all my shoots.
Lighting For The Edit
When shooting on DV or HD, and editing on a non–linear system, time in correcting light levels, by using filters in the software, can be greatly reduced if a light meter is used to measure output from key lights, fill lights and luminance levels during the actual shoot. A light meter can be especially helpful in keeping all light levels within a workable exposure range. With latitudes of video formats being around one half-stop (over or under the optimum exposure), using a light meter correctly can assure a constant, even lighting ratio from one scene to the next.
The contrast range of DV and HD cameras can be greatly controlled through correctly lighting a scene and by using the right lighting instruments. I cannot emphasize enough that if your expectation is to render a beautiful, soft, warm image with your video camera, you will not do it using small, low wattage instruments with inadequate or no diffusion. Regardless of the camera format, regardless of misleading articles on lighting found in monthly video magazines, regardless of the pitches by light manufacturers for “DV LIGHTING” and regardless of all the magical software claims, the result will be nothing more exciting than a piece of news or wedding video footage unless your key light source is at least twice the size of your subject and properly diffused.
Small instruments are perfect when used for what they were designed for, kickers, rakes, rims etc, but when used as a key, small hard lights (even with a sheet of diffusion) can keep you chasing the problems that they create. Let Peter Pan chase shadows, our job is to light and shoot a scene quickly and accurately.
Adding Fill Light Under Fluorescent
When shooting a large interior under fluorescent lighting; rather than turning the fluorescent sources off and creating a dark background, by introducing a hard sharp light from a tungsten light kit, add a Rosco 1/2 CTB color correction gel to your tungsten lights and then balance the camera to the mixed source using the #1 or tungsten filter setting on your camera. The results should be a well balanced and pleasing color rendition. If you can keep the key light about 1/2 stop brighter than the ambient light, the talent will stand out a bit more from the background without the background going too dark.
Another approach would be to use a fluorescent light bank fitted with the same Kelvin temp bulbs that are in the overhead fixtures (cool whites, etc.) as your key and fill lights. Tungten lights, with or without correction gel, can be used in conjunction with Flo-banks. Several companies, such as Kino Flo and ARRI, make professional Flo-banks that can be used for this application as well as with Tungsten and Daylight balanced setups.
Pay Attention to Contrast In A Scene
The distance from light to subject affects the contrast of a scene. The further away the light is from your subject, the flatter and more muted the tones will be. Don’t set up lights for a master shot at the back of a room and then zoom in to fill the frame for a close up under the same lighting. Always re-set the lights closer to your subject as the camera moves in. When increasing the size of a shot (going from a single person to a two shot or three shot), you will need to increase the output of your light source in order to maintain the same contrast that you had in your close up. Having larger wattage fixtures will assure you this type of versatility.
Merely moving a low wattage light back to fill a larger scene area, and then opening the aperture to accommodate the light loss, will render a well exposed flat looking image!
Form A Style for Lighting
When determining how you want your lighting to look, you should first form a style of lighting that will accommodate the scene or job that you are about to shoot. I like to use a very soft light when I shoot, so I am prepared to use higher wattage lights to accommodate the light that will be lost when I add diffusion. You need to establish your own look and style.
Kickers & Rim Lights
Don’t over do hair and rim lights. Remember; the eye is attracted to the bright areas of a shot, so keep your selected contrast ratios in mind when setting rakes or kickers. Rakes or kickers should not be more than 3/4 of a stop brighter than your key if you want to stay within the contrast range of video. If you do not need a hair light, don’t use one. Sometimes it is best not to use a hair light on someone who is bald or who has blond or white hair. For this instance, maybe all you would need is a background or shoulder light to add separation between subject and background.
Lighting For Eye-wear
When lighting people who wear glasses; keep your lighting more to the side and a bit higher than normal to eliminate light reflections in the lenses. Also, have your talent keep their chin lowered a bit. This will help eliminate reflections in their glasses and give them a warmer look by widening their eyes a bit. A soft high light from the key or fill in the lens is acceptable as long as it does not cover the subjects eye.
Using Fill Lights
Do not get carried away with using fill lights or cards to light under the chin. Your shot should not reveal that you placed a heavy light below the camera lens. A fill light under the chin should not cast a dominant shadow. If adding an eye-light, keep it close to the top of the camera lens and about 2-3 stops less in brightness than the key light. An eyel-ight is used to fill the eyes and shouldn’t compete with the key light.
Neutral Density Filters
When shooting outdoors, you can use camera Neutral Density filters to limit depth of field. This will help keep backgrounds soft which will help focus attention to your subject. Auxiliary Neutral Density filters that attach to the front of your lens, come in a variety of densities that hold back light ranging from 1 stop to 4 stops. These filters can be purchased through your camera or lighting dealer.
You may choose to purchase a matte box to accommodate square filters. These auxiliary type filters also come in “Grads.” Auxiliary ND’s are great because you can use densities that may not be available on your particular camera’s filter wheel and they can easily be used indoors with the #1 or tungsten filter setting.
Sony camera users will notice that the daylight ND densities on their camera are in fractions. In case you were wondering how much light, in stops, each fraction represents, here is a reminder: 1/2=1 stop, 1/4=2 stops, 1/8=3 stops, 1/16=4 stops, 1/32=5 stops and 1/64=6 stops.
Choosing A Background Outdoors
When shooting outdoors, choose a background that is not brighter or lighter in color than your subject is, if you can help it. Shooting your subject against a bright background will be difficult to light since it can reflect light as much as two or three stops brighter than what would be on your talent. Choosing a darker background outdoors to shoot against will allow you to light your talent without the background becoming over exposed. A great and simple way to light a subject outdoors is to first silk the talent from bright sunlight. Collapsible silks, that can fit into a stand bag, are made by a number of companies such as Bogen, Chimera and Westcott.
Using a grip arm to attach the silk to a C-stand (minimum size of silk should be 40”x40”) raise it above your subject to diffuse the intense sunlight. The silk will absorb about 1-2 stops of light. You may need to kick in some fill light and this can be done by using a white fill card or reflector board set at the opposite side to where the sun is being diffused from. I prefer using reflector boards over fabric discs because any moving light from a disc flexing in a wind will be very evident on video. These fabric discs were originally devised for still photography use and a more rigid reflector might be a bit more user friendly.
Once the talent is lit outdoors using a silk and reflector, the background can appear a bit bright. Introducing a double net just behind the talent, on another C-stand, can bring the background down a stop. Be sure that the C-stands are well sand bagged so they don’t fall over on the talent. You may need 2-3 bags on each stand or have a crew member hold the stand as a precaution. Using a long focal length lens will help eliminate picking up detail in the net that is behind the talent. With larger sets, you will need larger silks and nets and more intense reflector boards or daylight balanced lights.
Control Your Depth-of-Field
To get a shallow depth-of-field, when shooting indoors or outdoors,use a longer focal length lens and set your camera further away from your subject. If a shallow depth-of-field is desired when shooting indoors, you can white balance your camera under the daylight filter setting and use the built in ND filters to enable you to use a wider aperture setting. This will allow the background to go a bit more out of focus. It is not necessary to position talent 10 feet from the background to accomplish a shallow depth-of-field if the proper focal length lens is used. You may also be able white balance your camera indoors using the daylight filter wheel in order to use the ND filters. More about depth of field and lenses later!
Diffusion Filters
Diffusion Filters, such as Pro Mist, Black Pro Mist and Soft F/X are available in various intensities. Choosing a diffusion filter for a particular job or scene should be well thought out. The more intense the effect of the filter is, the more distorted the image will become. This can make your scene look out of focus or “fuzzy.” It is always safer to choose a less intense diffusion filter, over a more intense filter, until you know exactly how your image will look after it is edited.
The camera settings that you choose to use with a particular filter can alter the intensity of the effect of that filter. The larger the aperture (i.e., f•2.8 – f•4), the more effect a filter will have. The smaller the aperture (i.e., f•11 – f•16), the less effect a filter will have. The longer the focal length lens is, the more effect a filter will have and the shorter the focal length of the lens is, the less intense the effect of the filter will be.
I hate to keep preaching this, but proper lighting will control the softness of an image more than a filter will. I shoot film various formats of video and I rarely use any filter on the camera lens. In a rare instance I will use an 1/8 or 1/4 promist, black promist or soft FX just to take more of an edge off, but never want the image to look like we used any kind of special effects filter over the lens.
Other considerations for choosing a diffusion filter can include camera compression, lens quality and resolution, chip size, tape format, edit process and form of distribution.
Remember; what you see on the field monitor is lacking the effect of your camera format and the editing process!